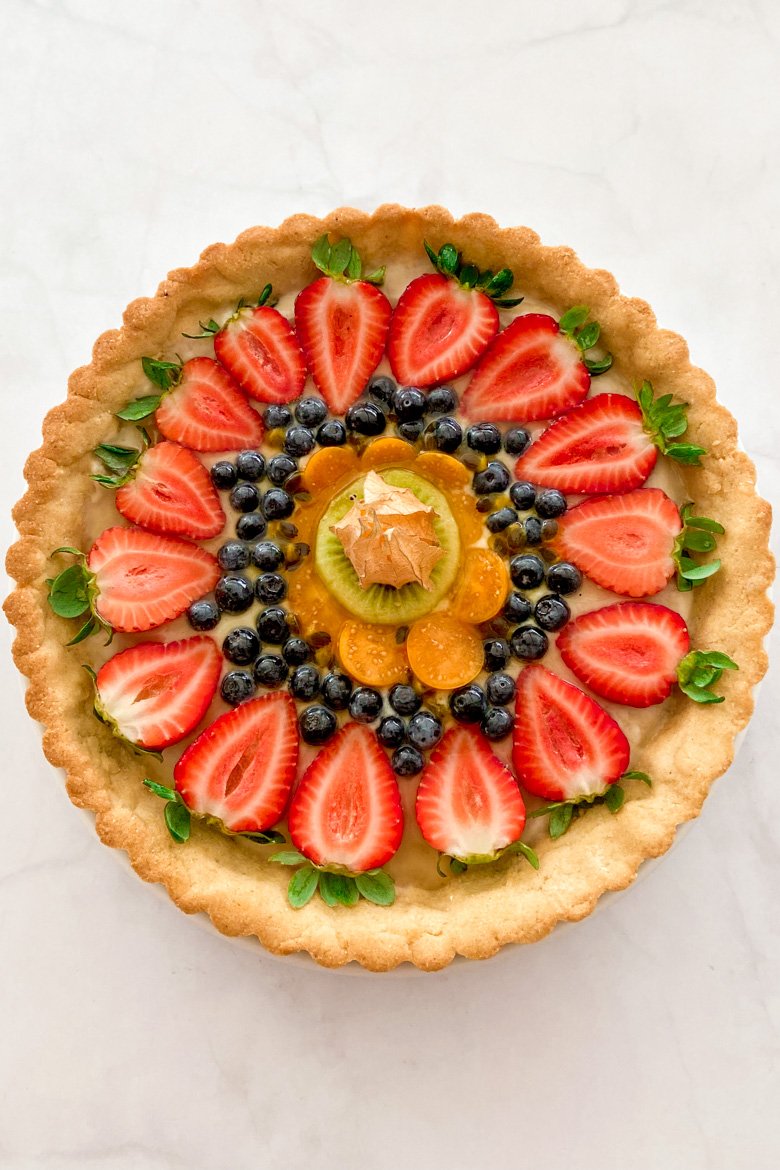
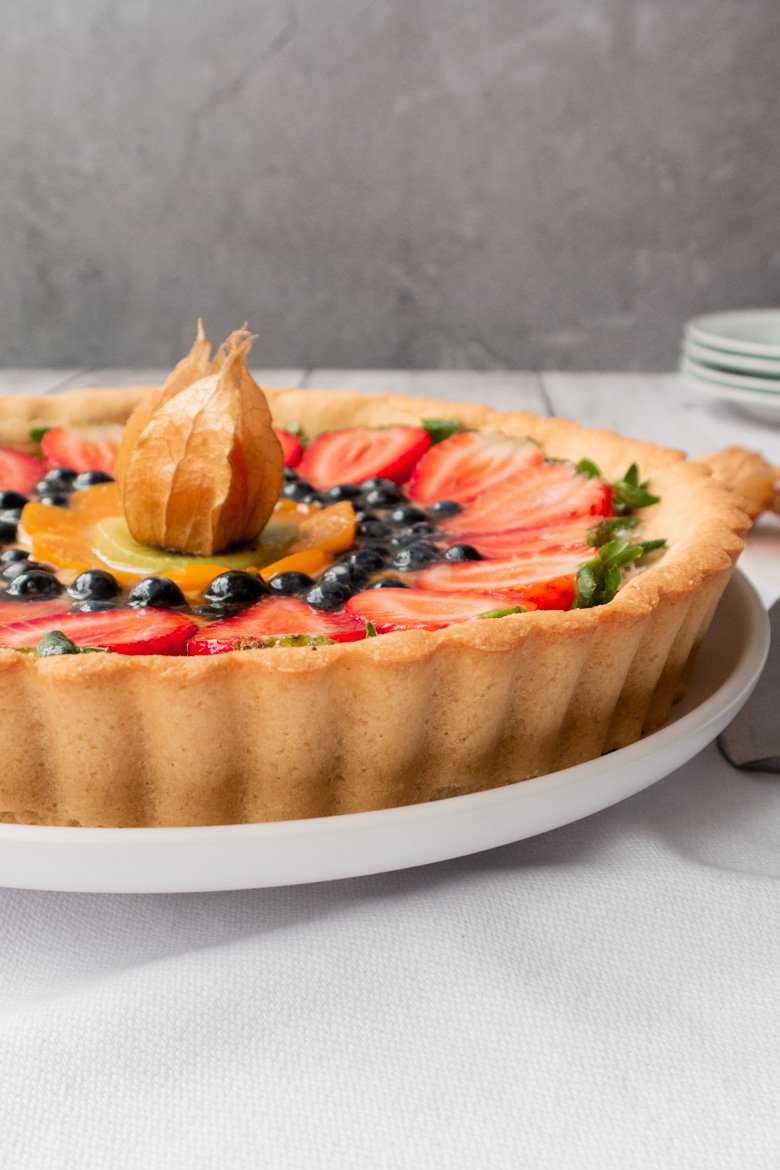
This fresh fruit tart recipe is served in a gluten-free pie crust that is crispy, slightly crumbly, and has a shortbread-like texture! Filled with homemade dairy-free pastry cream (cremè pâtissèrie) and decorate with fresh fruits.
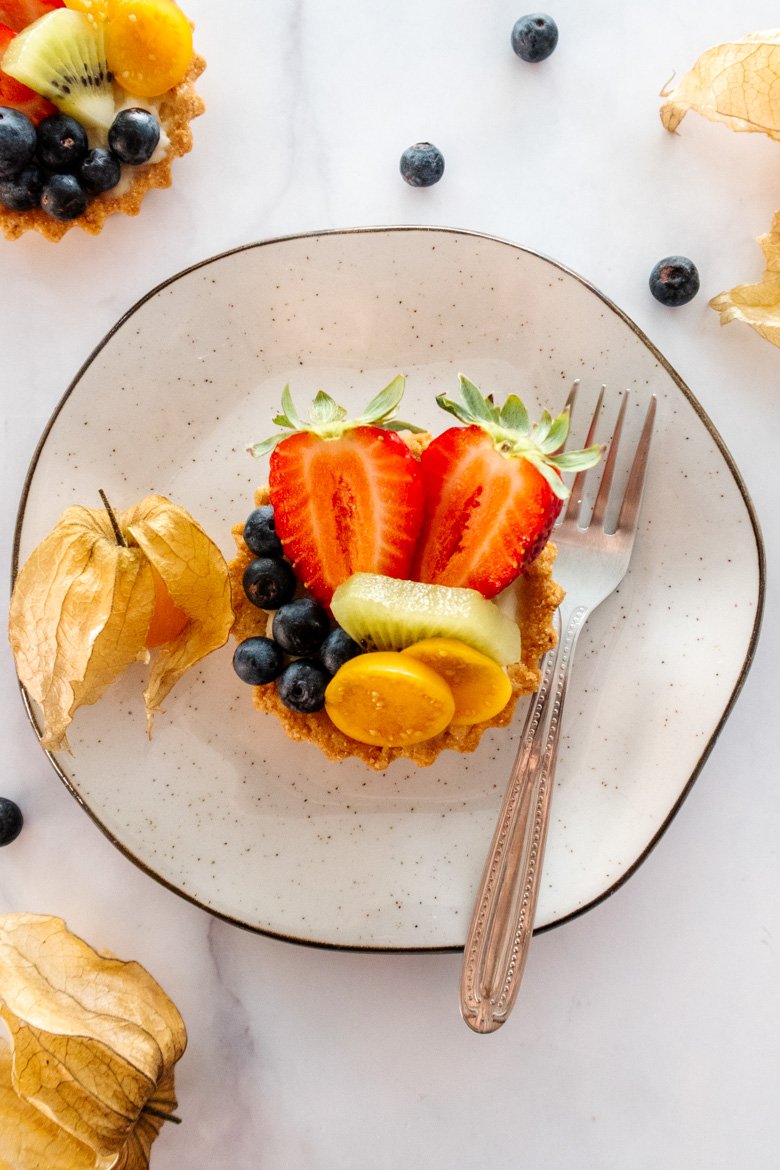
The fruit tart is perfect for any occasion, and I am sure it will please anyone! This recipe makes one fruit tart or 14 small tartlets!
There are three main components in this fruit tart with pastry cream:
- A firm, soft and crumbly, and buttery flavor pie crust.
- Homemade vanilla flavor pastry cream, which is so delicious.
- And fresh fruits.
Let’s start with the pie crust, which is a little different from the classic tarts you’re used to.
Table of Contents
PÂTE SUCRÉE
Classic custard and fresh fruit tarts aren’t served in biscuit crust but rather in a French-style short pastry crust known as pâté sucrée, which translates to “sweet pastry.” However, the pâté sucrée crust is much sweeter than all other pie crusts. In addition, it is a little crunchy, softer than the others, and very similar to a shortbread.
To make the fruit tart gluten-free and low-carb, I changed it a bit but still left the taste and texture of a traditional sweet pastry like pâté sucrée!
I used a mix of nutritious and low-carb flour. And instead of using sugar, as pâté sucrée is normally made, I used xylitol, but it’s okay to use sugar if you want.
I simply wanted to make this fruit tart as healthy as possible for those who can’t or don’t want to consume sugar or want to avoid it. This way, anyone can enjoy this fresh fruit tart guilt free!
Many crust pie recipes use an egg yolk and then add ice water, but I’ve found the best result is using a whole egg and not adding any water. This is also one of the rare cases where I recommend using a cold egg rather than a room-temperature egg. Keep all ingredients as cold as possible to prevent the sides of the pie crust from falling off while baking!
HOMEMADE PASTRY CREAM RECIPE
My recipe for homemade pastry cream (crème pâtissière) is very easy and quick to make. You don’t have to wait hours for it to cool down before filling your fruit tart pie. This pastry cream is dairy-free and sugar-free, and the results are exactly the same as traditional pastry cream: rich, creamy, and smooth!
For the pastry cream you will need:
- Plant-based milk – I recommend using coconut milk for a creamier texture, but almond milk works too.
- Xylitol – This cream is not overly sweet. As such, you’ll only be using a small amount of xylitol. You can use sugar instead if that is your preference.
- Cornstarch – Helps to thicken the pastry cream (crème pâtissière) without leaving it with a floury taste or sticky texture, as this can happen when using wheat flour as a thickener. I wanted a stiffer, more stable pastry cream, so I used 50g/1.7oz cornstarch. If you prefer the cream to be less firm, you can cut the amount of cornstarch in half. I suggest using organic cornstarch.
- Yolks – This recipe is made with yolks only. Save these egg whites to make meringues or use them to make Veggie Egg Muffins.
- Vanilla extract – You can use half a vanilla bean (seeds only) or any flavoring of your choice (cardamom, citrus peel, etc.).
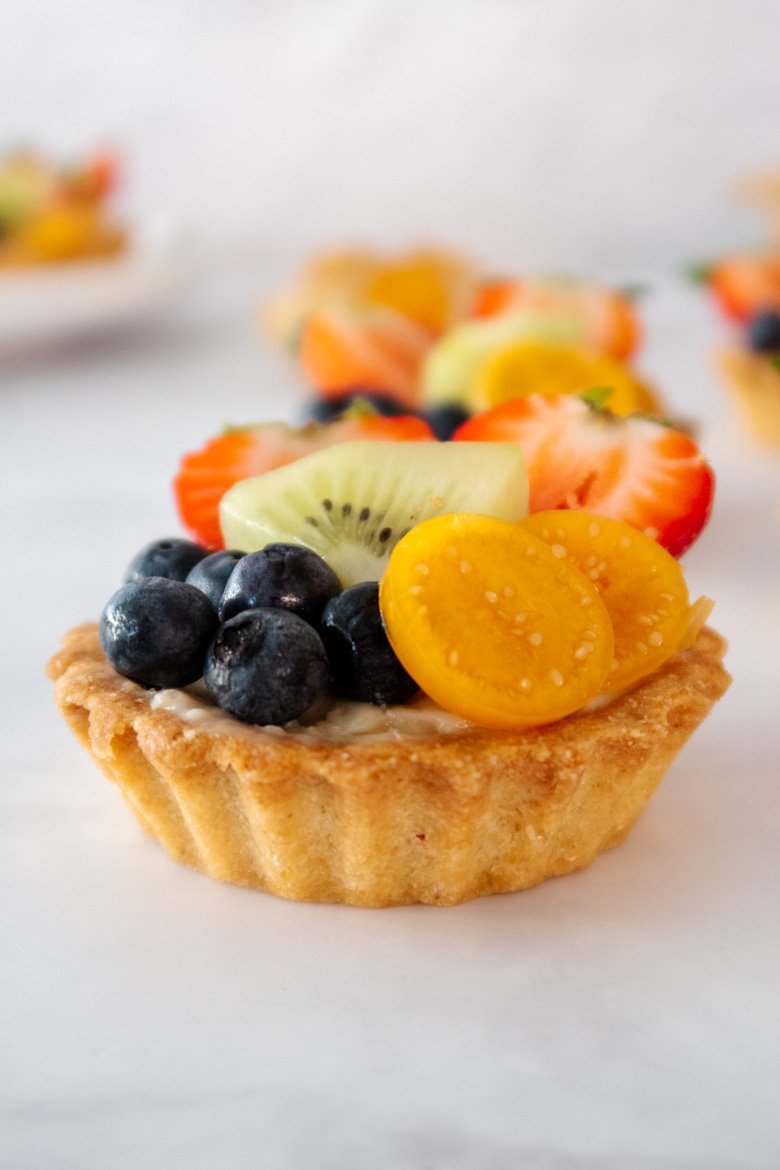
WHAT ARE THE BEST FRUITS TO USE IN THIS FRUIT TART
You can use just about any fruit you like to decorate the fruit tart, but if you’re using a particularly juicy fruit (like slices of ripe peach or mango), I recommend decorating the fruit tart just before serving.
Here are some of my favorite fruit options to choose from for this fruit tart:
- Strawberries (this one is a must for me)
- Blueberries
- Kiwi slices
- Blackberries
- Raspberries
- Physalis
- Mango
- Grape
- Apricots

FRUIT TART GLAZE
After assembling the fruit tart, you can lightly brush the fruits with a little tart glaze. This step is optional but adds a gorgeous shine and a nice extra dose of slight sweetness. Many bakeries add this glaze to desserts made with fresh fruits for the nice glossy finish of the fruits.
HOW TO MAKE THE FRUIT TART WITH PASTRY CREAM (CREMÈ PÂTISSÈRIE)
To make the fruit tart pie:
- Mix all the dry ingredients except xylitol, cut the butter into pieces, and add to the dry ingredients. With your fingertips, mix until you get a crumbly dough.
- Then add lightly beaten eggs, vanilla extract, xylitol, and lemon zest and mix until you get a smooth dough. Kneading is not necessary.
- Open the dough with the help of your fingers straight onto the baking pan with removable bottom. (You can also open the dough with a rolling pin, use the plastic wrap when extending the dough, and then transfer it to the baking pan.)
- Use a fork to pierce the bottom of the dough in a few spots. Pricking holes in the pie dough allows the steam to escape while it’s baking. Without this, the steam would puff up in bubbles and pockets throughout the crust, which would make some parts of the crust cook too quickly and also result in an uneven surface for your filling. You can also line the pie with parchment paper and add some dry beans on top.
- Bake in oven at 180°C/350°F for 15 to 20 minutes. Remove and let it cool.


To make the pastry cream (crème pâtissière) for this fruit tart:
- In a medium bowl, place the egg yolks and add xylitol. Then, with the help of a whisk, beat until you get a smooth and whitish cream. Sift the cornstarch over the egg yolk mixture, and mix with a whisk. Set aside.
- In a medium saucepan, add the coconut milk and the vanilla. Cook over very low heat until it begins to boil, then turn it off.
- Add a little hot milk to the egg mixture to temper the eggs. Mix it to incorporate. Then add the tempered eggs to the milk and cook over low heat. As soon as the mixture starts to boil, stir it constantly. Cook for 3 minutes and turn it off.
- Wait a few minutes for the cream to cool slightly. Pour the custard into a bowl and immediately cover the surface with plastic wrap, making sure the plastic wrap is touching the whole surface. This is to prevent custard skin from forming on top.
- Refrigerate the custard for 1 hour. The custard will have “set” after chilling. So it is important to whisk the pastry cream to make it smooth before using.
- Assemble the tart by adding the pastry cream to the pie crust, then decorate it with the fruits. Brush the top of the fruit with the glaze.


INGREDIENTS AND HOW TO PREPARE FRUIT TART GLAZE (2 OPTIONS):
Gelatin Glaze:
- 3 sheets of colorless gelatin
- 1/3 cup (80g) of Xylitol
- 1/3 cup of water
- 1 tsp of lemon zest
- 1 tsp of orange zest
- 1 tsp Vanilla Extract
- In a bowl with cold water, soak the gelatin sheets for approximately 5 minutes.
- In a medium saucepan, add water, xylitol, orange and lemon zest. Cook over medium heat until it starts to boil and the xylitol crystals dissolve. Turn it off, add vanilla extract, and let cool for 5 minutes.
- Squeeze the excess water from the gelatin sheets and add it to the flavored water, stirring until dissolved. Strain the mixture through a fine mesh strainer to remove any lumps. Let the mixture cool slightly.
- Brush gently top of the fruits on the tart. Alternatively, toss the fruit in the glaze before adding them to the tart.
Agar Glaze:
- 1⁄2 cup filtered water
- 2 tbsp of Agave
- 1⁄4 tsp of Agar
- In a small saucepan, add all the ingredients.
- Cook on low heat until the glaze reaches a trickle point. That is when we lift the spoon, and the glaze does not drip but forms a trickle.
- Brush over the fruit gently.

GLUTEN-FREE FRUIT TART STORAGE
Store the fruit tart in an airtight container (I usually wrap mine in plastic wrap). It will last for up to two days in the refrigerator (longer than that, the fruit tends to release some liquid).

MORE TART RECIPES
- Pineapple and Coconut Tart
- Healthy Banoffee Pie
- Chocolate Truffle Tart

Fresh Fruit Tart With Pastry Cream
Equipment
- Large bowl
- Small Bowl
- Sieve
- Medium saucepan
- Whisk
- Spatula
- Baking pan preferably with a removable bottom, (10 in/25 cm)
Ingredients
PIE CRUST:
- ¾ cup (100g/3.5oz) millet flour
- ¾ cup (100g/3.5oz) brown rice flour
- ⅔ cup (60g/2.1) almond flour
- ⅔ cup (70g/2.5oz) cornstarch
- ¼ tsp salt
- 4 tbsp (60g/2.1oz) butter or ghee, chilled
- 2 whole eggs
- 1 tsp vanilla extract
- 3 tbsp (40g/1.4oz) powdered xylitol*
- 1 tbsp lemon or lime zest
PASTRY CREAM:
- 4 free-range egg yolks
- 4½ tbsp (60g/2.1oz) powdered xylitol*
- 2 cups coconut or almonds milk
- 2 tsp of vanilla extract, or ½ vanilla bean or any flavoring of your choice: cardamom, citrus peel, etc.
- ½ cup (50g/1.7oz) g cornstarch*
- fresh fruit, strawberries, kiwis, blueberries, mango, physalis
Instructions
PIE CRUST:
- Blend the xylitol in the blender to make a powder.
- Mix dry ingredients except xylitol. Cut the butter or ghee into pieces and add to the dry ingredients. With your fingertips, mix until you get a crumbly dough.
- Add lightly beaten eggs, vanilla extract, xylitol, and lemon zest, and mix until you get a smooth dough, but don’t knead or stir too much.
- Open the dough with the help of your fingers straight onto the baking pan with removable bottom or small tartlets. (You can also open the dough with a rolling pin, use the plastic wrap when extending the dough, and then transfer it to the baking pan.) Use a fork to pierce the bottom of the dough in a few spots.
- Bake in oven at 180°C/350°F for 15 to 20 minutes. Remove and let it cool.
PASTRY CREAM:
- In a medium bowl, place the egg yolks and add xylitol. Then, with the help of a whisk, beat until you get a smooth and whitish cream.
- Sift the cornstarch over the egg yolk mixture, and mix with a whisk. Set aside.
- In a medium saucepan, add the coconut milk and the vanilla. Cook over very low heat until it begins to boil, then turn it off.
- Add a little hot milk to the egg mixture to temper the eggs. Mix it to incorporate. Then add the tempered eggs to the milk and cook over low heat. As soon as the mixture starts to boil, stir it constantly. Cook for 3 minutes and turn it off.
- Wait a few minutes for the cream to cool slightly. Pour the custard into a bowl and immediately cover the surface with plastic wrap, making sure the plastic wrap is touching the whole surface. This is to prevent custard skin from forming on top.
- Refrigerate the custard for 1 hour. The custard will have “set” after chilling. So it is important to whisk the pastry cream to make it smooth before using.
- Assemble the tart by adding the pastry cream to the pie crust, then decorate it with the fruits.
- Brush the top of the fruit with the glaze. This step is optional, see the ingredient list and instructions on the blog!
Notes
- Xylitol measurement in spoons before blending to make a powder.
- You can cut the cornstarch in half or so, depends how stiff or loose would you like to have your cream.