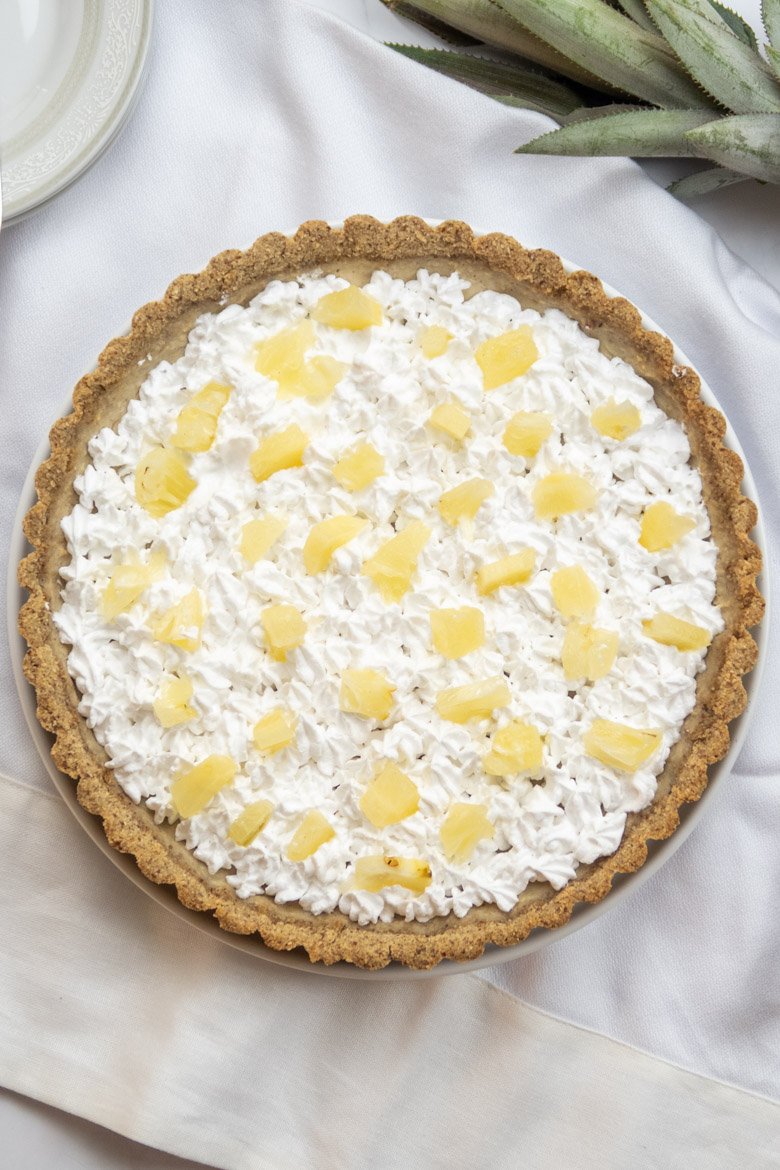
This pineapple and coconut tart is delicious, creamy, and easy to make. The tangy, sweet pineapple cream is layered into a crunchy coconut crust and then topped with whipped coconut cream. Pineapple and coconut give this tart a fabulous tropical flavor, perfect for completing a summer meal. This pineapple tart is also gluten-free, grain-free, nut-free, and low-carb.
I love this pineapple tart because the filling is light and has a refreshing citrus flavor. This is one of my favorite desserts! This pineapple tart is an impressive dessert to serve on any occasion. I like to serve this tart as a Sunday lunch dessert, as it helps with digestion due to pineapple’s digestive enzymes.
Table of Contents
PINEAPPLE TART RECIPE INGREDIENTS
This delicious and healthy pineapple tart consists of three sub-recipes:
- Pineapple Cream Filling
- Coconut Flour Crust
- Coconut Whipped Cream
COCONUT FLOUR CRUST:
- Coconut flour – Coconut flour is dry and dense and tends to absorb a lot of liquid. Therefore, I suggest feeling the dough as you knead it to see whether you need more liquid. This also depends a lot on the brand of coconut flour you are using. If it is homemade coconut flour, the residue of coconut milk, absorbs less liquid than store-bought flour.
- Flaxseed flour – You can use golden or brown flaxseed. Flaxseed flour is rich in fiber and a vegetable source of omega 3, which is a perfect option for vegans.
- Potato starch – This gluten-free flour helps with lightness and crispiness. It is a binding agent that forms a perfect structure for the dough.
- Coconut sugar – You can use another type of sugar if you prefer. Coconut sugar contains inulin, a type of fiber that helps reduce the glycemic index of this recipe.
- Egg – Helps bind and add moisture to the dough. Use the egg at room temperature.
- Coconut Oil – It helps to hold the dough together. Use melted coconut oil.
- Water – As needed. Add very little at the begging. If the dough is still a little dry in some parts, add a little more water and knead again until you get the point of the dough.
PINEAPPLE TART FILLING:
- Pineapple – It’s the main ingredient in this dessert, but did you know that pineapple improves digestion and is anti-inflammatory? It’s rich in bromelain, an enzyme that is mainly found in the core of this fruit, so it is important that you use the core of the pineapple to get these benefits.
- White raisins – They serve to sweeten the pineapple tart, so there is no need to use sugar. If the pineapple is very sweet, there is no need to use any sweetening agent. Other suggestions to sweeten the pineapple cream are turbinado sugar, light brown sugar, molasses, or whatever you prefer.
- Cinnamon – It is optional. You can also use ginger, lemongrass, cloves, or anything you want, that gives a little flavor or omit flavoring in this pineapple tart. If you are going to use ginger, the benefit of it is that it will also help with digestion.
- Coconut Cream or Coconut Butter – Coconut cream is a type of thick cream made from coconut milk. Although canned versions are widely available, you can also make coconut cream at home. Simply refrigerate coconut milk for a few hours and observe how a thick layer of cream floats to the top and separates from the thin, watery liquid below. The coconut butter is made with the pulp beaten until it turns into butter. See below how to do it. Coconut butter is different from coconut oil, which is why you cannot substitute cream or butter for coconut oil. However, if you don’t have coconut butter or coconut cream, you can use very concentrated coconut milk for flavor. The filling will thicken a little bit less. Make sure to cook the pineapple until very dry and all juice is evaporated.

WHIPPED COCONUT CREAM
To make whipped coconut cream you will need a coconut cream, powdered sugar, and vanilla extract. See my whipped coconut cream recipe, or use store-bought coconut whipped cream.
HOW TO MAKE HOMEMADE COCONUT BUTTER
To make coconut butter, it’s pretty simple!
- Grate the coconut meat, and dry it in the oven at a very low temperature (about 70-100 ̊C/160-210 ̊F). It should not burn or toast, just dehydrate. If you prefer, you can buy ready-dehydrated coconut meat (keep an eye on the ingredients as it should only contain a coconut)
- Then take it to the food processor or blender (if it’s hot, it will blend easier).
- This process will take time and can be heavy on your utensil, so do it little by little. If necessary, add a little coconut oil to help with blending (do not use water, as this will reduce the shelf life of the butter). When it forms a very smooth cream, it’s ready!
- The shelf life of homemade coconut butter will be about one month at room temperature. Keep it in a sterilized airtight glass jar!

HOW TO MAKE PINEAPPLE AND COCONUT TART
This pineapple and coconut tart recipe is delicious and super easy to make at home.
TO MAKE THE CRUST FOR THE PINEAPPLE TART:
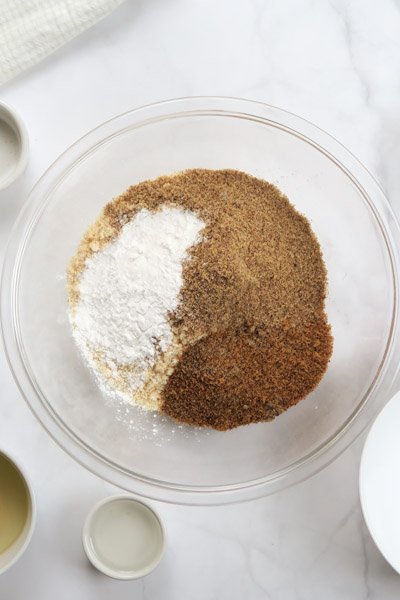
- In a bowl, add coconut flour, flaxseed flour, potato starch, and coconut sugar. Stir until all the flour is well combined.
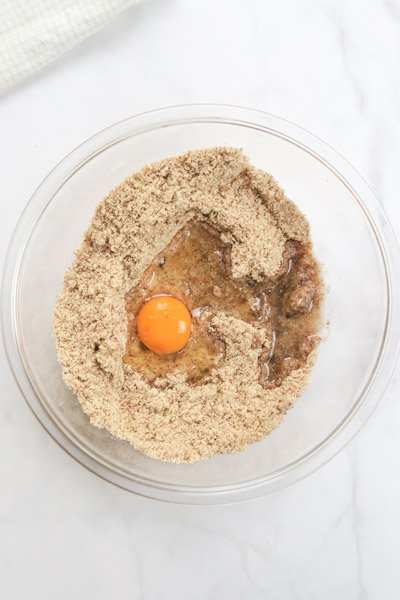
- Then add the egg and the coconut oil, and stir together until all the dry ingredients are coated with the wet ingredients. As you knead the dough, you will feel whether it needs to add water. Coconut flour is dense and needs some extra moisture. I used homemade coconut flour, and I didn’t need to add much water. If you are using store-bought flour, probably you will need to add more water, or you can add an extra egg instead. The dough is ready when it comes together and does not stick to your hands.
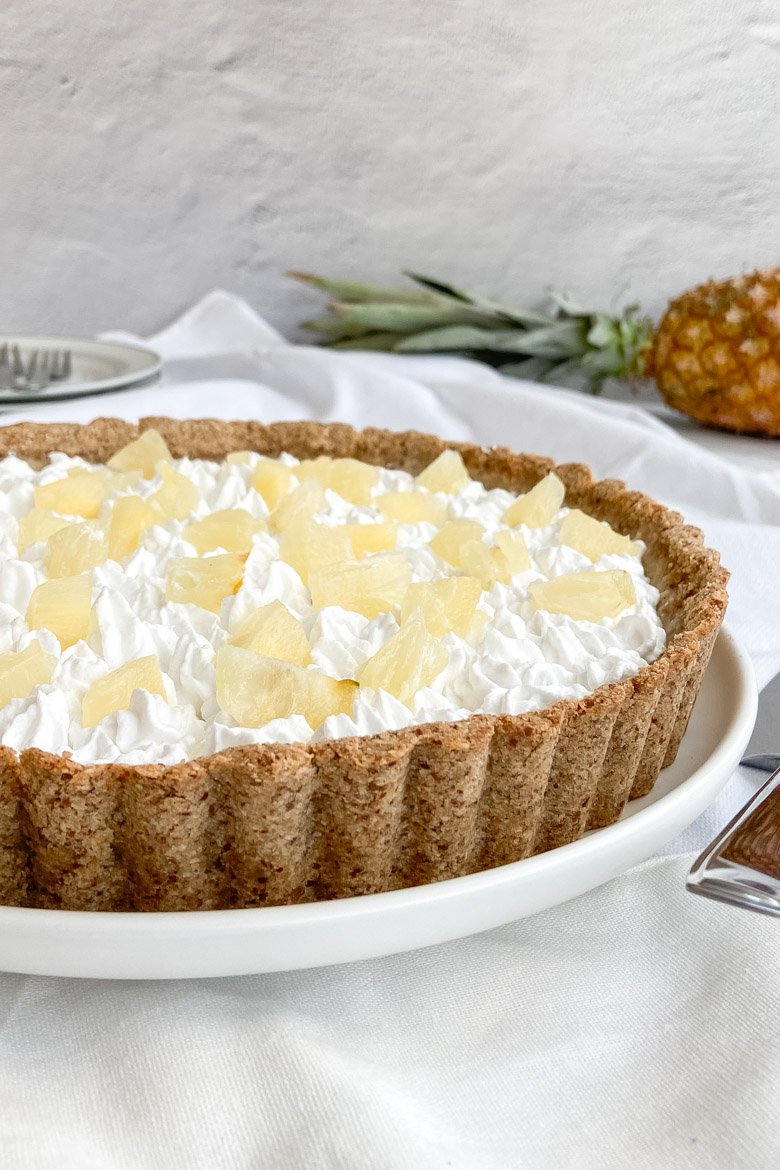
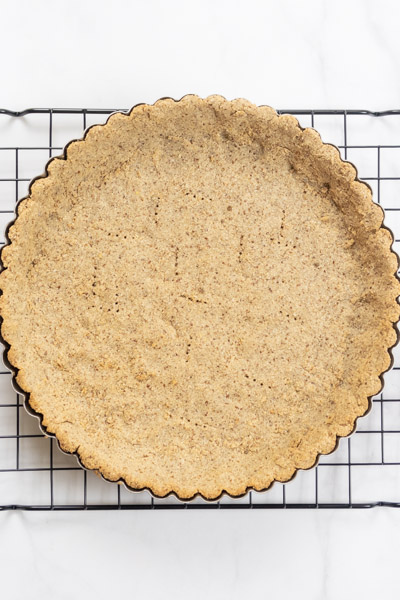
- Press the dough directly into a 9-inch tart pan. Use a fork to prick the bottom in a few spots to prevent the dough from rising while baking. You can also line the crust with parchment paper and place beans on top.
- Bake in a preheated oven at 180 ̊C/350 ̊F for 15 minutes until lightly golden. Let it cool before adding the filling.


TO MAKE THE PINEAPPLE TART FILLING:
Now let’s prepare the filling for the pineapple tart. To make this pineapple tart super healthy, we won’t be using any sugar, as pineapple is sweet itself, and to add a bit more sweetness, we will add natural sugar using raisins.
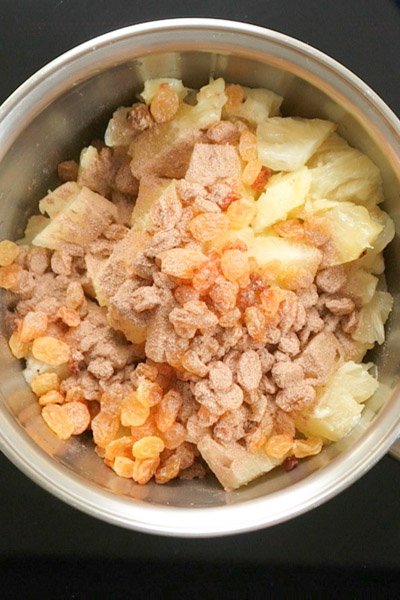
- Place the pineapple, raisins, and cinnamon in a saucepan, close with the lid, and cook on medium heat for about 10 minutes. The pineapple will release a lot of juices as it cooks. Remove the lid and cook for another 5 minutes to evaporate the liquid.
- With the pineapple still hot, add it to a food processor or blender, and add the coconut butter or coconut cream. Beat, until creamy, at your desired consistency. (The difference when beating the pineapple in a blender and a food processor is that, in a blender, the cream will be very smooth, and in a food processor, the cream will have some pineapple pieces left. You can choose the consistency you prefer.)
- Remove the crust from the tart pan onto a serving plate. The crust for this pineapple tart is very dry, so it comes out very easily from the pan.
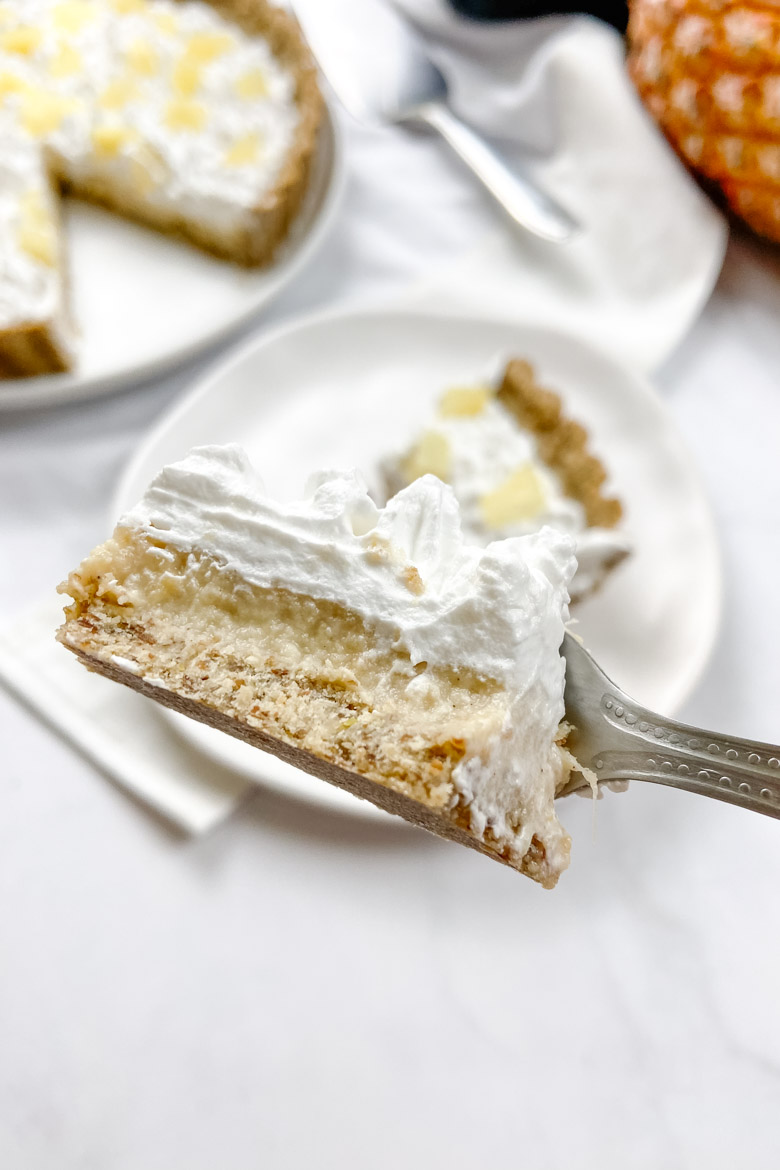
- Spread the pineapple cream over the crust and use an offset spatula to spread it to the edges of the crust.
- Refrigerate between 30 minutes and 8 hours. The refrigerating time will depend on the consistency of the pineapple cream, and how loose or firm it is. See my tips below.
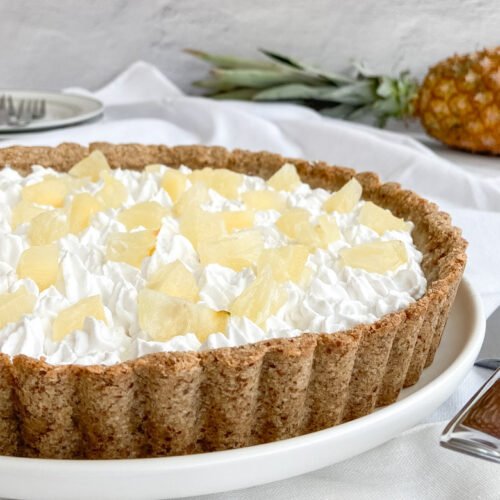
- After refrigeration, the pineapple tart should be firm. Decorate with some coconut whipped cream and some pineapple pieces.


TIPS FOR PINEAPPLE TART
- Coconut flour is dry and dense and tends to absorb a lot of liquid. Therefore, I suggest feeling the dough as you knead it to see whether you need to add a little more liquid.
- To obtain more firm pineapple cream, I suggest cooking the pineapple until all the juices are evaporated and the pineapple is dry.
- Using a food processor makes the pineapple filling more firm, as you can process it less and leave some chunks of pineapple.

PINEAPPLE TART STORAGE
Since the pineapple tart is super light and delicious, I assure you, there won’t be leftovers! But if you have some, cover the pineapple tart with plastic wrap and refrigerate for up to 4 days. You can also freeze the pineapple tart, without whipped cream.
To freeze:
Cut the pineapple tart into slices and store the leftovers in an airtight container in the freezer. It lasts up to 2 months in the freezer – perfect for a quick dessert!
To defrost, place a slice in the fridge the night before. Or you can also let the slice rest on the kitchen counter for about 30 minutes. Once defrosted, enjoy!
Pineapple And Coconut Tart
Equipment
- Tart pan 9-inch (23cm)
- Large bowl
- Saucepan
- Spatula
- Blender
- Kitchen scale
Ingredients
Crust:
- 2 cups (140 g/5 oz) coconut flour
- ½ cup (50 g/1.8 oz) flaxseed flour
- ¼ cup (40 g/1.4 oz) potato starch
- 4 tbsp (40 g/1.4 oz) coconut sugar, or other sugar of your choice
- 2 tbsp coconut oil
- 1 egg
- Water as needed
Filling:
- 450 g/16 oz pineapple, chopped
- ½ cup (70 g/2.5 oz) white raisins, or sugar
- 1 tsp cinnamon, *optional
- ⅔ cup (130 g/4.6 oz) coconut butter or coconut cream , *it's not the oil, it's the butter, made with the pulp of dried coconut or cream which is the hard part that builds up on top of coconut milk
Topping:
- 1 coconut whipped cream, *optional
- chopped pineapple, for decorating, *optional
Instructions
Crust:
- In a large bowl, add 2 cups (140 g/5 oz) coconut flour, ¼ cup (40 g/1.4 oz) potato starch, ½ cup (50 g/1.8 oz) flaxseed flour, 4 tbsp (40 g/1.4 oz) coconut sugar. Stir until all the flour is well combined.
- Then add 2 tbsp coconut oil, and 1 egg, and stir together until all the dry ingredients are coated with the wet ingredients. If necessary, add a little water to get the right point of the dough. The dough is ready when it comes together and does not stick to your hands.
- Press the dough directly into a 9-inch tart pan. Use a fork to prick the bottom in a few spots to prevent the dough from rising while baking. You can also line the crust with parchment paper and place beans on top.
- Bake in a preheated oven at 180 ̊C/350 ̊F for 15 minutes until lightly golden. Let it cool before adding the filling.
Filling:
- Place 450 g/16 oz pineapple, ½ cup (70 g/2.5 oz) white raisins, and 1 tsp cinnamon in a saucepan, close with the lid, and cook on medium heat for about 10 minutes. The pineapple will release a lot of juices as it cooks. Remove the lid and cook for another 5 minutes to evaporate the liquid.
- With the pineapple still hot, add it to a food processor or blender, and add ⅔ cup (130 g/4.6 oz) coconut butter or coconut cream . Beat, until creamy, at your desired consistency.
- Remove the crust from the tart pan onto a serving plate. Spread the pineapple cream over the crust and use an offset spatula to spread it to the edges of the crust. Refrigerate between 30 minutes and 8 hours.
- Decorate with some coconut whipped cream and pineapple pieces.