This gluten-free vegan pizza recipe is healthy, high in fiber, and super nutritious. Plus, it’s easy to make and uses few ingredients! This vegan pizza crust is made with pumpkin puree, which gives a slightly sweet flavor that goes well with any toppings! Due high fiber content, this pumpkin pizza crust is excellent for digestion. So if you tend to feel bloated after eating gluten-containing products, you won’t feel uncomfortable after eating this delicious gluten-free vegan pizza!

There are so many different veggie pizza ideas out there right now. I love that they’ve become a “trend” because any incentive to increase your vegetable intake is good. You don’t have to be on a gluten-free diet to enjoy a plant-based pizza crust. And this vegan pumpkin crust pizza is just a way to put some extra veggies on your plate and make it nutritious yet tasty! We should always try to include vegetables or roots in the preparations. Therefore, we can reduce the amount of flour used.
Table of Contents
VEGAN PIZZA RECIPE INGREDIENTS
- Pumpkin puree: You can make the puree with most winter squashes, but I like to use kabocha or buttercup as it is less watery. You can also use the canned puree to speed up things.
- Psyllium husk: It is a soluble fiber that will help you with digestion.
- Olive oil: Adds moisture to the dough.
- Yeast: I am using instant yeast for dough fermentation.
- Brown sugar: Helps to feed the yeast.
- Chickpea flour: A very nutritious flour, as it contains a good amount of protein, fiber, vitamins, and minerals.
- Brown rice flour: This is another nutritious flour as it is an excellent source of fiber, vitamins, minerals, and antioxidants.
- Tapioca starch: Helps to bind ingredients together and add moisture.
- Salt: Adds flavor to the dough.
- Millet: This cereal grain belongs to the grass family. It is gluten-free and has high protein, fiber, and antioxidants. I am using it as a stuffing in this recipe to substitute cheese.
HOW TO MAKE VEGAN PIZZA
GLUTEN-FREE VEGAN PIZZA CRUST
Let’s start by preparing the dough for this vegan pizza crust. For this, we will need two bowls, a larger one for the flour and a smaller one for the wet ingredients.
Mix the wet ingredients:
In a large bowl, add the instant yeast, sugar, olive oil, and pumpkin puree. (Ideally, you should prepare this puree with oven-roasted squash, as it absorbs less water than boiled. If the puree is too runny or too watery, you’ll need to adjust the consistency of the dough with more flour). Mix the wet ingredients very well until smooth.
Mix the dry ingredients:
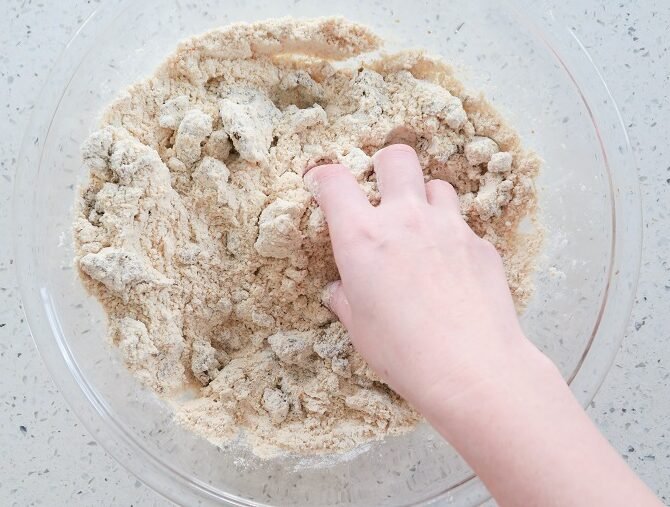
In another large bowl, add the chickpea flour, brown rice flour, tapioca starch and salt. Mix until the flours are well incorporated.

Combine the wet and dry ingredients:
Mix the wet and dry ingredients together. The best is to use your hands to work the dough ingredients together. This way, you will feel the dough consistency as you knead it. The dough will seem dry and shaggy at the begging, but keep working it until all the flour is moistened and the dough comes off your hands. If the dough is too dry, you can add some extra water. Add the water slowly in small portions and feel the dough as you knead it. Be careful not to miss the point and add too much water! The dough has to be soft and nice to work with and not stick to your hands.
Fermentation of the dough:
Cover the dough with plastic wrap or a kitchen towel and let it ferment for at least 30 minutes, preferably 1 hour. If you prefer, you can place the dough inside the turned-off oven. The dough will not rise as much but will be very soft.


Roll the dough:
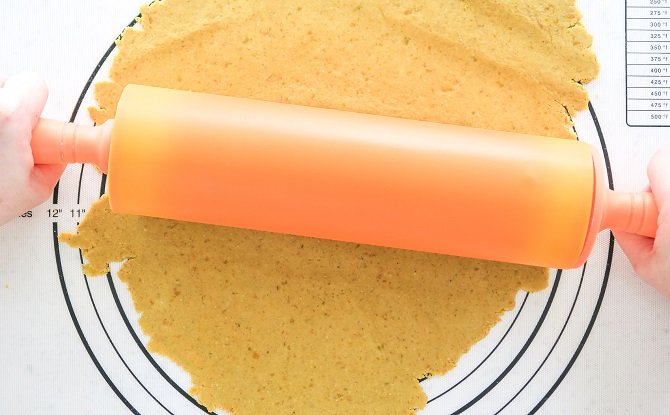
When the dough has fermented, it’s time to roll it out with a rolling pin. I am using a silicone mat to help with opening the dough. A silicone mat makes it easier to roll out the dough, as it does not stick to the countertop. And I do not need to use extra flour to sprinkle the countertop. If you do not have a silicone mat, use plastic wrap or sprinkle some flour on the countertop. Roll out the dough to the desired thickness. I like to make the vegan pizza crust about 0.2 inch/0.5 cm thick.
Form the dough:
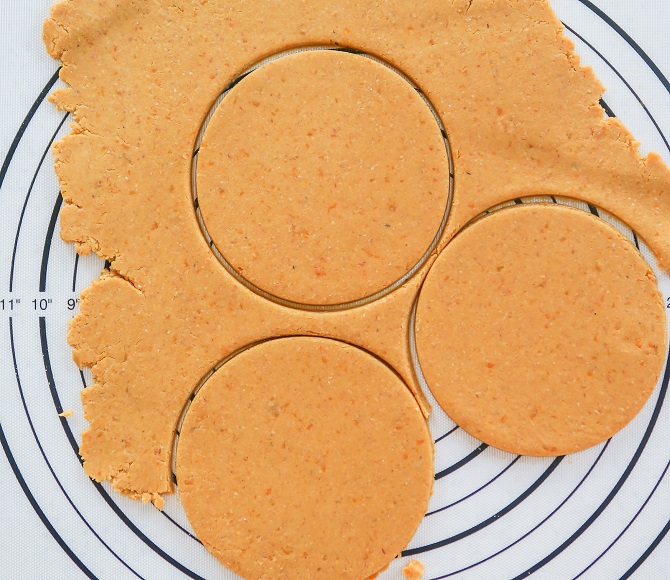
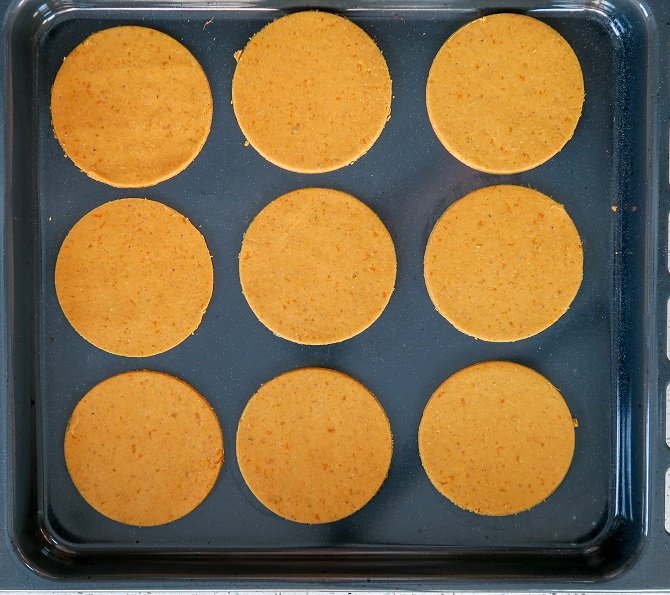
Cut the dough into mini pizzas, or if you prefer, you can make one or two large pizzas. To cut the dough into mini pizzas, use a doughnut cutter, a bowl or a lid from a pot to cut it into round shapes.
Pre-bake the vegan pizza crust:
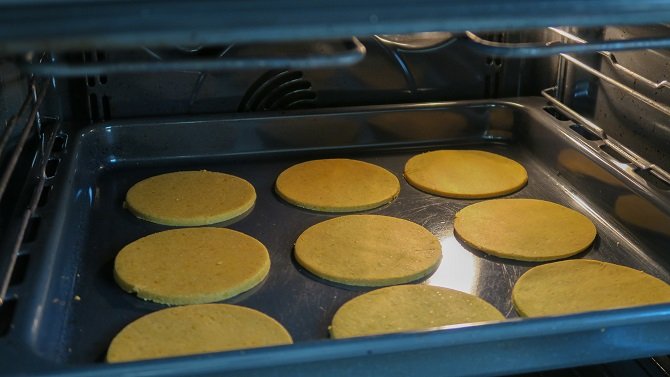
To help loosen the dough from the counter, you can use a knife and place the shaped dough onto a baking sheet. It is good to pre-bake the dough before adding the stuffing. If you bake the vegan pizza dough with the sauce on top, the dough will absorb the sauce and become very soggy. So I like to pre-bake the dough to seal it, then add the toppings. Pre-bake the vegan pizza dough for 10 minutes at 350-390°F/180-200°C.
MILLET CREAM FOR TOPPING THIS VEGETARIAN PIZZA
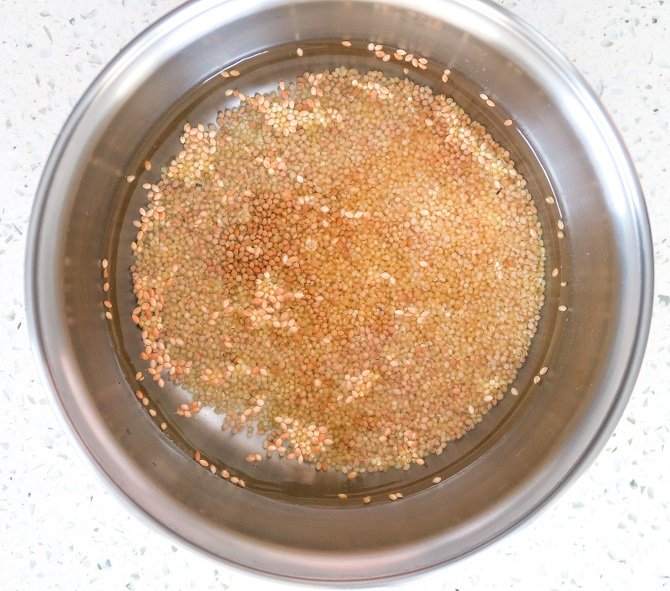
To replace the cheese in this vegan pizza, I am using a millet cream, which is super delicious, and you will not miss the cheese on this pizza! Millet is a cereal, make sure to buy it deshelled!
Cook the millet:
Cook the millet with plenty of water to cover it completely. The millet will absorb all the water while cooking. When the millet is done cooking, it will resemble “soggy” rice.
Beat the millet:
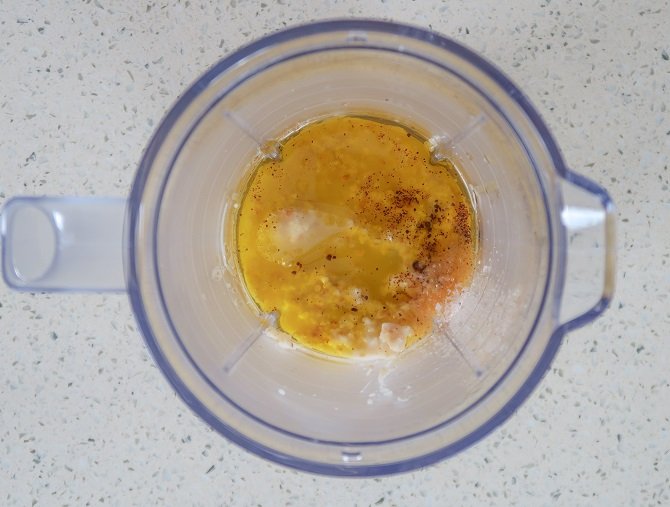
Place the cooked millet in a blender and beat it with olive oil, lemon and salt. If desired, add some water, little by little, and beat again until you find the point you want. It needs to have a consistency of smooth cream. Lastly, add some freshly grated nutmeg to the cream and mix it up with a spoon.


ASSEMBLING THE MINI PIZZAS
When the millet cream and pre-baked vegan pizza crust are ready, all you have to do is assemble it.
Pizza Stuffing:
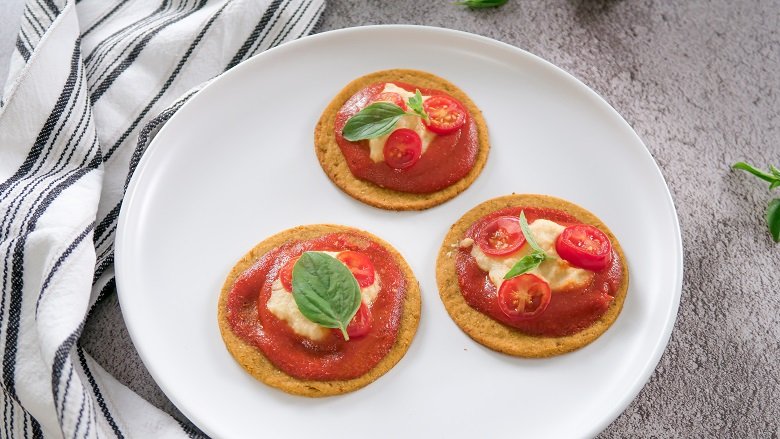
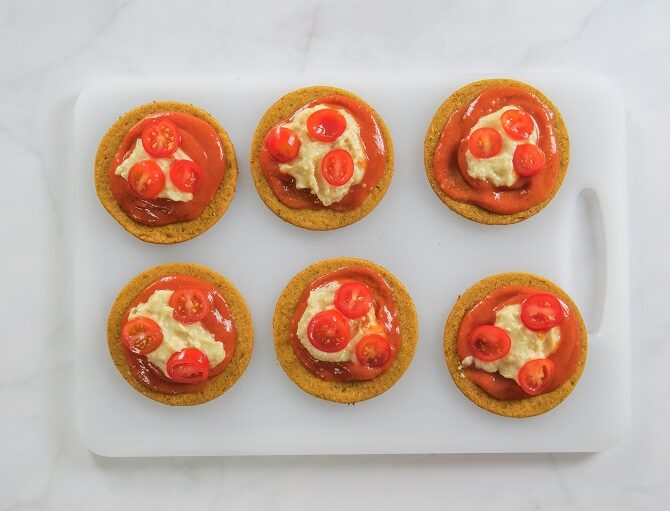
First, add some tomato sauce as a base. I’ve used my marinara sauce recipe. Then spoon the millet cream on top. The millet cream has an amazing texture and flavor! And lastly, top this homemade vegan pizza with whatever you like. I used some cherry tomato and basil as vegan options, but sometimes I like to top it with eggs, olives and dried tomatoes.
Bake:
When the vegan pizza is assembled, take it back to the oven and let it bake for about 15 minutes. Once the veggie pizza is done baking, I like to top it off with some fresh basil and a dash of black pepper to serve.

HOW TO STORE THIS VEGAN PIZZA
This vegan pizza with pumpkin crust can be frozen, or it can be stored for 3 days in the refrigerator.
To freeze the vegan pizza, place the crust in a freezer bag, separating each crust with parchment paper to prevent sticking the crust to each other. You can freeze pre-baked pizza crust for up to 3 months. Defrost the crust in the fridge overnight and bake for 5 minutes on average before stuffing it.
If you’re looking for an easy weeknight meal or if you’re looking for something different and fun for the weekend, then this vegan pizza is for you.


Gluten-Free Vegan Pizza
Equipment
- 2 Large bowl
- Kitchen scale and/or Measuring Spoons
- Rolling Pin
- Silicone Mat
- Blender
- Spatula
- Baking Sheet
- Small Pan
- Bench Scraper
Ingredients
PIZZA CRUST
- 1 cup (200 g/7 oz) pumpkin puree*, or another tuber such as cassava or sweet potato – *see note
- 2 tbsps (10 g/0.3 oz) psyllium
- 2 tbsps olive oil
- 3 tbsps (30 g/1 oz) brown sugar
- 1½ tbsps (15 g/0.5 oz) active yeast
- 1 cup (150 g/5 oz) chickpea flour
- ½ cup (75 g/2.6 oz) brown rice flour
- ⅓ cup (50 g/1.7 oz) tapioca starch
- 1 tsp (7 g/0.2 oz) salt
- Water, if necessary
MILLET CREAM
- ¼ cup (50 g/1.7 oz) millet, deshelled, raw
- 2 cups water, for cooking the millet
- ¼ cup olive oil
- ½ lime, juice only
- Salt to taste
- Nutmeg to taste
- Water, if necessary. (To loosen the cream, if too thick.)
Instructions
PIZZA CRUST
- In a large bowl add 1 cup (200 g/7 oz) pumpkin puree*, 2 tbsps (10 g/0.3 oz) psyllium, 2 tbsps olive oil, 3 tbsps (30 g/1 oz) brown sugar and 1½ tbsps (15 g/0.5 oz) active yeast. Mix until all the ingredients are well incorporated.
- In another large bowl add 1 cup (150 g/5 oz) chickpea flour, ½ cup (75 g/2.6 oz) brown rice flour, ⅓ cup (50 g/1.7 oz) tapioca starch and 1 tsp (7 g/0.2 oz) salt Mix all the flours until well incorporated.
- Mix the wet and dry ingredients together. The best is to use your hands to work the dough ingredients together. This way, you will feel the dough consistency as you knead it. The dough will seem dry and shaggy at the begging, but keep working it until all the flour is moistened and the dough comes off your hands. If necessary add water, little by little, to find the ideal texture of the dough.
- Keeping the dough in the bowl. Cover the dough with plastic wrap or a kitchen towel and set it on the counter at room temperature or in the turned-off oven. Allow to ferment for 30 minutes or 1 hour. The dough will not rise as much but will be very soft.
- When the dough has fermented, it's time to roll it out with a rolling pin. Roll out the dough to the desired thickness. Cut the dough into mini pizzas, or if you prefer, you can make one or two large pizzas, if desired, fold the edges.To roll out the dough, I am using a silicone mat to help with opening the dough. A silicone mat makes it easier to roll out the dough, as it does not stick to the countertop. And I do not need to use extra flour to sprinkle the countertop. If you do not have a silicone mat, use plastic wrap or sprinkle some flour on the countertop.
- To help loosen the dough from the counter, you can use a knife or a bench scraper and place the shaped dough onto a baking sheet. Pre-bake the vegan pizza dough for 10-15 minutes at 350-390°F/180-200°C.
MILLET CREAM
- Cook the ¼ cup (50 g/1.7 oz) millet with 2 cups water. The millet will absorb all the water while cooking. When the millet is done cooking, it will resemble “soggy” rice.
- Place the cooked millet in a blender with ¼ cup olive oil, juice from ½ lime, and some salt to your liking. Beat until smooth. If need add some water, little by little, and beat again until you find the point you want. It needs to have a consistency of smooth cream. Lastly, add some freshly grated nutmeg to the cream and mix it up with a spoon. (The millet cream has a firmer consistency after cooling, to soften add some more water.)
ASSEMBLING THE MINI PIZZAS
- When the millet cream and pre-baked pizza crust are ready, all you have to do is assemble it.First, add some tomato sauce as a base. Then spoon the millet cream on top. And lastly, top with whatever you like. I used some cherry tomato and basil.
- Bake for about 10 minutes at 200°C/390℉.
- To serve top it with some fresh basil and a dash of black pepper.